Welcome to the captivating world of orchids, where the art of propagation unveils the mysteries behind multiplying these exquisite plants. Orchids, known for their stunning beauty and diverse species, have captivated enthusiasts for centuries. Whether you're a seasoned orchid lover or a novice gardener, understanding the delicate process of propagation opens doors to a rewarding journey of nurturing new life.
Propagation is the key to expanding your orchid collection, allowing you to share the beauty of these botanical treasures. This comprehensive guide will explore various methods, from dividing established plants to exploring the wonders of keiki propagation. Join us as we embark on a detailed exploration of the techniques, tools, and tender care required to successfully propagate orchids and unlock the secrets to cultivating these extraordinary blooms in your garden.
Table of Contents
- Orchid Propagation Timing: Key Moments For Multiplication
- Factors To Consider Before Orchid Propagation
- Required Materials For Orchid Propagation
- Multiple Methods For Orchid Propagation
- Orchid Species & Their Propagation Methods
- Splitting A Sympodial Orchid
- Back Bulb Propagation Technique For Sympodial Orchids
- Orchid Keikis: Propagation Essentials
- Propagating Orchids Through Aerial Root Division
- Unlocking The Secrets Of Orchid Seed Germination
- Orchid Propagation Blunders: Mistakes To Learn From
- Frequently Asked Questions
- Conclusion
Orchid Propagation Timing: Key Moments For Multiplication
For the propagation of the Orchid, it's not important which method you are applying for it, rather you need to examine the bloom cycle when it is completed or reinvigorate the planting medium. Avoid propagating the plant even if it is baby keiki, at this age, it is broken or removed from the pot easily. When you see your orchid outgrowing its pot and young pseudobulbs growing roots, this is the appropriate sign that your sympodial orchid needs to be propagated.
Factors To Consider Before Orchid Propagation
Before starting to propagate orchids, there are several important factors to consider:
- Ensure the parent orchid is healthy and free from diseases or pests. Propagating from a healthy plant increases the likelihood of successful outcomes.
- Different orchid types may have specific propagation requirements. Research and understand the particular needs of the orchid species you plan to propagate.
- Opt for a suitable time for propagation, usually during the growing season when the plant is actively producing new growth. This varies among orchid species, so research the specific timing for your orchid.
- Have clean and sharp tools ready for the propagation process. Sterilize knives, scissors, or any cutting tools to minimize the risk of infections.
- Different orchids can be propagated through various methods such as division, keiki removal, aerial root division, or from seeds. Choose the method that best suits the orchid species and your skill level.
- Ensure you have the appropriate potting mix or agar-based medium for the chosen propagation method. Orchids have specific requirements for their growing medium, so use a mix suitable for your orchid type.
- Maintain a clean and sterile environment for the propagation process. Sterilize pots, containers, and any equipment you'll be using to minimize the risk of contamination.
Note: By considering these factors, you increase the chances of successful orchid propagation and the development of healthy, thriving plants.
Required Materials For Orchid Propagation
Don't fret while propagating an orchid, you need not copiously types of equipment or tools. Though it’s a bit challenging and has a specific method to do it on your own by following the right instructions:
- Sterilize Trimming Shears/ a razor blade/ a sharp small knife – they can be disinfected if you soak them in alcohol for a little longer.
- Average-sized orchid containers to plant it.
- Orchid hangers for outdoor ring system.
- Peat mosses and accepted mosses are also known as sphagnum moss, quacker moss, or bog moss.
- Healthy Orchid / Orchid potting medium
- Fungicide
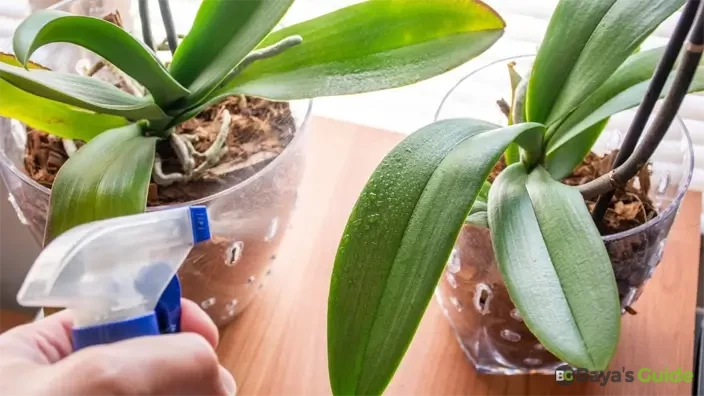
- Spray bottle
Multiple Methods For Orchid Propagation
- Division - Separate the orchid plant into sections, ensuring each section has healthy roots and shoots.
- Keiki Offsets - Some orchids produce small plantlets called Keiki. These can be detached and potted when they have developed roots.
- Back-Bulb Division - Divide the orchid by separating mature pseudobulbs with roots from the main plant.
- Stem Cuttings - Cut a healthy stem with nodes and aerial roots, then plant it in a suitable medium.
Note: Remember, the success of propagation depends on the specific orchid species, so it's essential to research the appropriate method for the type of orchid you have.
Orchid Species & Their Propagation Methods
Here are various orchid types along with their recommended propagation methods:
Phalaenopsis Orchids - Propagate through Keiki Offsets found on flower spikes.
Cattleya Orchids - Divide when outgrowing containers, ensuring each division has roots.
Dendrobium Orchids - Divide mature pseudobulbs with roots or separate keikis.
Vanda Orchids - Separate keikis or use stem cuttings with aerial roots.
Lady's Slipper Orchids (Paphiopedilum) - Divide when multiple growths appear.
Oncidium Orchids - Divide at the base or separate mature pseudobulbs with roots.
Splitting A Sympodial Orchid
In case you want to propagate the orchid plants in your home gardener, you can achieve your target easily by dividing the plant with sympodial orchids, such as sprout pseudobulbs, rhizomes, oncidiums, and cattleyas. Planting the division comes out in the most feasible orchid blooming within the following year. Dividing sympodial orchids involves separating the plant into distinct sections, each with its pseudobulbs and roots. Here's a step-by-step guide:
1- Selecting The Optimal Timing
The optimal time for division is usually during the orchid's growing season when new shoots are emerging.
2- Extracting The Sympodial Orchid From Its Pot
Gently extract the orchid from its pot, ensuring it firmly grasps the base of the plant. Use a sharp tool to loosen the soil around the pot's edges if necessary. Lift the orchid along with the potting medium and place it at the desired planting location, taking care not to harm the roots.
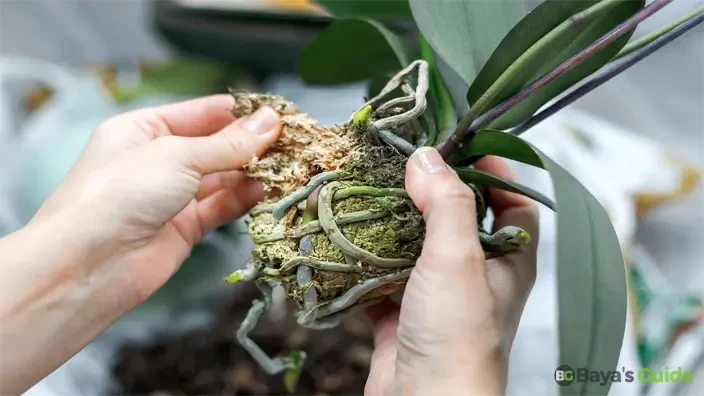
3- Inspect The Pseudobulbs & Roots
Identify suitable sections for division. Each section should have healthy pseudobulbs, leaves, and roots. When you pull out the plant from the pot, examine the big tangle of rhizomes from roots to twigs and stems. Then attach one or more leads with rhizomes which will show the accurate and active growth of pseudobulbs along with blossoming leaves.
4- Prepare Potting Mix
Use a well-drained orchid mix. Orchid bark or a mix of sphagnum moss and perlite is commonly used.
5- Separate Young Pseudobulbs
When you are cutting the rhizome, leave at least the rhizome fastened with the main rhizome by using a sterilized knife to cut off the group of rhizomes. Don’t worry seeing that you are losing a few joints if you have preserved only a few that’s all enough for your plant’s propagation. Get the growing rhizome without roots and attach it to the back bulbs.
Separating pseudobulbs and rhizomes involves gently dividing them with a clean, sharp tool. Ensure each division has roots attached, and plant them in a suitable growing medium. Carefully handle the plants to avoid damage during the separation process.
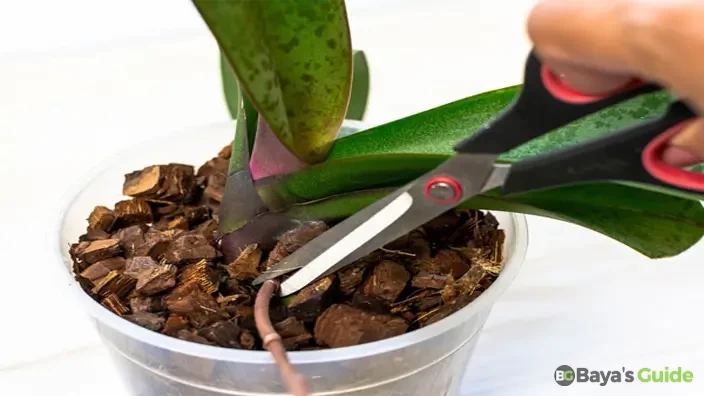
6- Sterilize Cut Surfaces
Sterilizing cut surfaces of rhizomes helps prevent infections. Use a diluted hydrogen peroxide solution or a fungicide to disinfect the cuts before planting. Sterilizing the roots is not the priority rather it fastens and increases the plant’s propagation and healthy growth.
7- Divide The Orchid
Use the knife or shears to cut between the pseudobulbs, ensuring that each division has a fair share of both roots and shoots.
8- Trim Roots (Optional)
Trim any damaged or unhealthy roots, leaving the healthy ones intact. This encourages new root growth.
9- Pot Up Your Division
Potting up orchid divisions involves placing each separated section into an appropriate-sized pot with fresh orchid mix. Ensure the roots are well-covered, and water lightly after potting.
10- Watering
Water the newly potted divisions thoroughly. Allow excess water to drain away.
11- Post-Division Care
Place the newly potted divisions in a shaded area for a few days to minimize stress. Gradually reintroduce them to their usual light conditions.
Remember to adapt these steps based on the specific needs of the orchid species you are dividing. It's crucial to provide appropriate care to the divided sections as they establish themselves in their new posts.
You Might Also Like: How To Wear A Kimono
Back Bulb Propagation Technique For Sympodial Orchids
- Select Healthy Back Bulbs- Choose mature, healthy back bulbs with viable nodes for propagation.
- Gather Materials- Prepare clean pots, orchid potting mix, and a sharp knife or scissors for cutting.
- Trimming - Trim excess roots and remove any damaged or rotting parts from the back bulbs.
- Cutting Back Bulbs - Use the knife or scissors to carefully separate the back bulbs, ensuring each section has at least one healthy eye or node.
- Sterilization - Sterilize the cut surfaces with a diluted hydrogen peroxide solution or fungicide to prevent infections.
- Prepare Pots - Fill small pots with an appropriate orchid potting mix. Make a small depression in the center for placing the back bulb.
- Planting - Plant each back bulb, ensuring the node is at or just below the surface. Gently press the potting mix around the bulb.
- Watering - Water the newly potted back bulbs lightly to settle the potting mix. Avoid overwatering to prevent rot.
- Provide A Suitable Environment - Place the pots in a warm, humid environment with indirect light. Consider covering them with a clear plastic dome to maintain high humidity.
- Monitor Growth - Regularly check for signs of new growth. Once new shoots or roots emerge, you can gradually expose the plants to normal growing conditions.
Note: Remember, patience is key in orchid propagation. It may take some time for new growth to appear.
Orchid Keikis: Propagation Essentials
Propagating orchids from Keiki (small plantlets) is a common method. Here's a step-by-step guide:
- Identify A Suitable Keiki - Choose healthy Keiki with a good root system. Keiki is often found growing along the flower spike or at the base of the orchid.
- Gather Materials - Prepare small pots, orchid potting mix, and a clean, sharp knife or scissors.
- Separate Keiki - Carefully separate the Keiki from the parent plant using a knife or scissors. Ensure each keiki has enough roots attached.
- Sterilize Cut Surfaces - To prevent infections, sterilize the cut surfaces of both the Keiki and the parent plant using a diluted hydrogen peroxide solution or a fungicide.
- Prepare Pots - Fill small pots with a suitable orchid potting mix. Create a small well in the center for placing the Keiki.
- Planting Keiki - Place each keiki in a pot, ensuring the roots are well-covered with potting mix. Gently press the mix around the keiki to secure it.
- Watering - Water the potted Keiki lightly to settle the potting mix. Avoid overwatering to prevent root rot.
- Provide Proper Environment - Place the pots in a warm, humid location with indirect light. You may use a clear plastic dome to maintain high humidity around the Keiki.
- Monitor Growth - Keep a close eye on the Keiki for signs of new growth. Once they have developed sufficient roots and leaves, you can gradually acclimate them to normal growing conditions. Remember to be patient during the process, as orchids can take some time to establish themselves and start growing vigorously.
Propagating Orchids Through Aerial Root Division
Propagation using aerial root division is a method often used for orchids with visible aerial roots. Remember, patience is crucial in orchid propagation. It may take some time for the newly propagated plants to establish and thrive. Here's a more detailed step-by-step guide:
- Select A Healthy Orchid - Choose an orchid that has well-established and healthy aerial roots.
- Prepare Material - Gather clean pots, orchid potting mix, a sharp knife or scissors, and a diluted hydrogen peroxide solution or fungicide for sterilization.
- Identify Suitable Aerial Roots - Locate mature aerial roots with nodes. These nodes are where new growth will emerge.
- Sterilize Tools - Sterilize the knife or scissors by dipping them into the diluted hydrogen peroxide solution or fungicide - Carefully cut the selected aerial roots into sections, making sure each section has at least one viable node.
- Sterilize Cut Surfaces - Immediately after cutting, dip the cut surfaces of the aerial root sections in the sterilization solution to prevent infections.
- Prepare Pots - Fill small pots with a suitable orchid potting mix. Create a small well in the center for placing the aerial root sections.
- Planting Aerial Root Sections - Place each aerial root section in a pot, ensuring the node is at or just below the surface. Gently press the potting mix around the root sections.
- Watering - Water the potted aerial root sections lightly to settle the potting mix. Avoid overwatering to prevent rot.
- Provide A Suitable Environment - Place the pots in a warm, humid environment with indirect light. Consider using a clear plastic dome or plastic wrap to maintain high humidity.
- Monitor Growth - Regularly check for signs of new growth. Once new shoots or roots emerge, you can gradually expose the plants to normal growing conditions.
Unlocking The Secrets Of Orchid Seed Germination
Growing an orchid from seed is a patient and delicate process. Begin by obtaining orchid seeds, which are tiny and dust-like. Sterilize the seeds and the equipment you'll be using, as orchid seeds are vulnerable to contamination. Create a sterile environment by working in a laminar flow hood or under sterile conditions. Prepare a suitable agar-based medium in sterile containers to provide a nutrient-rich environment for the orchid seeds to germinate. Distribute the seeds evenly on the medium and seal the containers to maintain sterility.
As the orchid seedlings grow, carefully transfer them to new containers with fresh medium. This process requires meticulous attention to avoid contamination and damage to the delicate seedlings. Once the orchid seedlings reach a sufficient size, you can consider transferring them to pots with an orchid potting mix. Growing orchids from seed demands dedication, as it typically takes several years for the plants to reach maturity and produce flowers. Patience and a meticulous approach to maintaining sterile conditions are key throughout the entire process.

Orchid Propagation Blunders: Mistakes To Learn From
Several common mistakes can hinder the success of orchid propagation. Here are some to avoid:
1- Neglecting Sterilization
Failing to sterilize tools, pots, and mediums can introduce contaminants that harm delicate orchid tissues. Always ensure a sterile environment to prevent infections.
2- Choosing Unhealthy Parent Plants
Propagating from unhealthy or stressed orchids can lead to weak or diseased offspring. Select only healthy parent plants for better chances of successful propagation.
3- Overlooking Timing
Timing is crucial. Attempting propagation at the wrong season or growth stage may reduce success rates. Research and understand the specific requirements of your orchid species.
4- Inadequate Patience
Orchid propagation often requires time. Impatience can lead to premature handling, damaging fragile roots or shoots. Be patient and allow the plants to establish properly.
5- Incorrect Propagation Method
Different orchids require specific propagation methods. Using the wrong technique may fail. Understand the suitable method for your orchid type and follow it meticulously.
6- Poor Watering Practices
Overwatering or underwatering during the propagation process can harm orchids. Maintain a balance, ensuring the growing medium is consistently moist but not soggy.
7- Ignoring Humidity Needs
Orchids often thrive in high humidity. Neglecting this requirement, especially during the initial stages of propagation, can lead to stress and poor development.
8- Using Wrong Growing Medium
Orchids have specific preferences for growing mediums. Using an inappropriate mix can impact root health. Choose a medium suitable for your orchid species.
9- Lack Of Adequate Light
Providing insufficient or excessive light can affect orchid growth. Understand the light requirements of your orchid and ensure it receives the appropriate amount of light for successful propagation.
10- Skipping Regular Monitoring
Neglecting to monitor the progress of propagated orchids can lead to issues going unnoticed. Regularly check for signs of growth, pests, or diseases.
By avoiding these common mistakes and being attentive to the specific needs of orchid propagation, you can increase the likelihood of successful outcomes.
Frequently Asked Questions
Can You Propagate Orchid From Stalk?
Indeed, orchids can be propagated from stalks, specifically herbaceous stems. Trim the stem at two nodal points and plant them in a suitable rooting medium. With proper care and attention, they will develop into robust orchid plants.
Are Orchids Hard To Propagate?
Though Propagating orchids is not a hard nut to crack it is rather challenging especially when you are functioning in this activity for the first time. You need to follow the variant method for propagating as per the variant types of orchids. That is not all enough, replanting requires the right conditions as temperature, proper humidity, and suitable lighting depending on the orchid’s type to succeed at its full rate. Keeping all these details in view, your effort will get an influential result though it is a time-consuming procedure.
How Do Orchids Propagate Themselves?
Orchids employ various methods for self-propagation, adapting to diverse environments. Some common ways orchids propagate themselves as Many orchids develop aerial roots that, under favorable conditions, can produce small plantlets called keikis. Keikis often have their own set of roots and can be separated from the parent plant once they have developed sufficiently.
Orchids with pseudobulbs, such as sympodial orchids, can naturally divide themselves. New growth emerges from the base of pseudobulbs, leading to the formation of separate plants that can be divided when mature. Orchids have evolved a variety of strategies to ensure their survival and adaptability in different environments. Each method corresponds to the specific needs and conditions of the orchid species, contributing to the remarkable diversity within the orchid family.
Conclusion
In conclusion, delving into the realm of orchid propagation unveils a world of endless possibilities for enthusiasts and gardeners alike. With a deeper understanding of the methods and techniques involved, nurturing new orchid life becomes not only feasible but immensely rewarding. Whether dividing sympodial orchids or harnessing keikis for propagation, each method offers a pathway to expanding one's orchid collection and experiencing the joy of cultivating these exquisite blooms.
By avoiding common pitfalls and embracing patience and diligence, the journey of orchid propagation becomes a fulfilling endeavor, promising the beauty of flowers and the satisfaction of successful growth. With each propagated orchid, a new chapter unfolds in the captivating story of orchid cultivation, enriching the lives of those who embark on this botanical adventure.