Removing a tire from a rim may seem like a daunting task, but with the right tools and a bit of know-how, it can be a straightforward process. Whether you need to replace a worn-out tire or repair a puncture, learning how to remove a tire from a rim is a valuable skill for any car owner.
Suppose you are worried about purchasing a tire removal machine that costs you a lot and requires you a huge mechanical knowledge about knowing the quality, replacing the tire, and fixing the new tire in place of the old one. You only need a small number of tools and a few tactics to remove the tire by inquiring how to remove the tire from the rim. For this, you can buy a tire changer that manually works but efficiently saves you money: that is a pry bar and screwdriver. This guide will make the removal of tires easier for you without calling for a mechanic. In this guide, we'll walk you through the step-by-step process to make the task hassle-free.
Table of Contents
- Tools & Materials Needed To Remove Tire
- Important Considerations Before Tire Removal
- Method 1
- Step 1: Lift The Vehicle
- Step 2: Loosen Lug Nuts
- Step 3: Remove Valve Core
- Step 4: Break The Bead
- Step 5: Break The Bead
- Step 6: Remove The Tire
- Step 7: Secure The Tire's Sides Using Your Feet
- Step 8: Lubricate The Bead
- Step 9: Lift The Tire Off The Rim
- Step 10: Fully Detach Lug Nuts
- Step 11: Operate The Pry Bar To Free The Rim
- Method 2
- Material Required For Manual Machine
- Step 1: Make A Plywood Machine For Tire Removal
- Step 2: Loosen The Stem Valve
- Step 3: Set The Tire On The Wood Base
- Step 4: Remove Bead With Rod
- Step 5: Turn The Tire With The Wedge
- Step 6: Lock The Changer
- Step 7: Use Dish Soap For Lubrication
- Step 8: Shift The Rim Using The Changing Rod.
- Step 9: Continue Elevating The Wheel's Lower Section
- Safety Precautions
- Frequently Asked Questions
- Conclusion
Tools & Materials Needed To Remove Tire
- Jack
- Lug Wrench
- Valve Core Tool
- Tire Iron OR Pry Bar
- Bead-Breaking Tool OR A Block Of Wood
- Tire Lubricant
- Tire Spoons OR Tire-Changing Machine (optional but recommended)
Important Considerations Before Tire Removal
- Twiddle thehead tire anticlockwise with a specific removing tool for the Removal of the valve core.
- Push the rubber downward applying force and part away the tire's braided edge from the rim.
- Better to do it manually.
- Lock the tire inside the tire-changing machine.
- Check the rim off keenly removing it with a changing rod.
Method 1
Step 1: Lift The Vehicle
Using a jack, lift the vehicle off the ground to ensure that the tire you are working on is completely free-spinning. Ensure the vehicle is securely supported on jack stands.
Step 2: Loosen Lug Nuts
Use a lug wrench to loosen the lug nuts on the tire but do not remove them completely at this point.
Step 3: Remove Valve Core
Using a valve core removing tool, remove the valve core from the tire's valve stem. This step releases the air from the tire. At this point, you need to set the tire on a smooth level surface and then look at the air valve. It is shaped like a small rubber-like metal that is ticking with the tire.
After fixing the valve removing tool, twist it anticlockwise forcefully to part it away. The removal tool you’ll use for removing the valve core is like a screwdriver and it is a relatively cheaper item. You need to pluck off a metal cylinder that is found inside the valve by sticking it at the edge of the removal tool. Don’t get fret as the removal of the core deflates the tire.
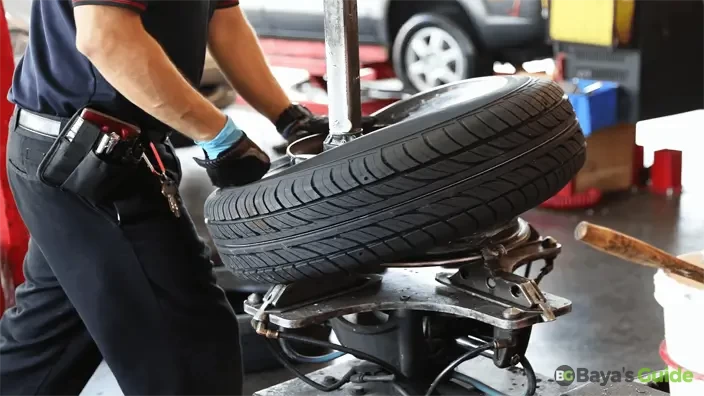
Step 4: Break The Bead
Looking keenly, you will see the braided edge of the rim which is also called the bead. If you are searching for the simplest method without applying a bulk of tools, throw it on a flat surface in front of a weighty vehicle and drive it on the rubber part. Moreover, to break the bead – the seal between the tire and the rim – you can use a dedicated bead-breaking tool or a block of wood. Position the tool against the tire sidewall and apply pressure to break the bead. The rubber will be pressed down, the bead will get out of the rim.
Step 5: Break The Bead
Employ your vehicle's weight by driving over the tire's bead repeatedly. If efforts fail, use a jack to lift, or tilt the tire, or resort to carefully cutting the bead with a sharp knife, ensuring no damage to the rim.
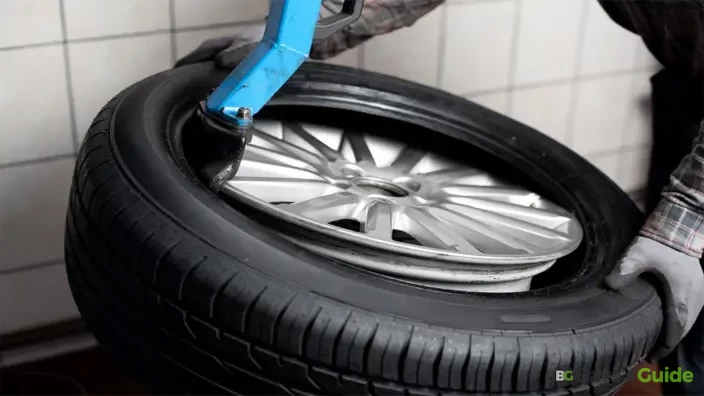
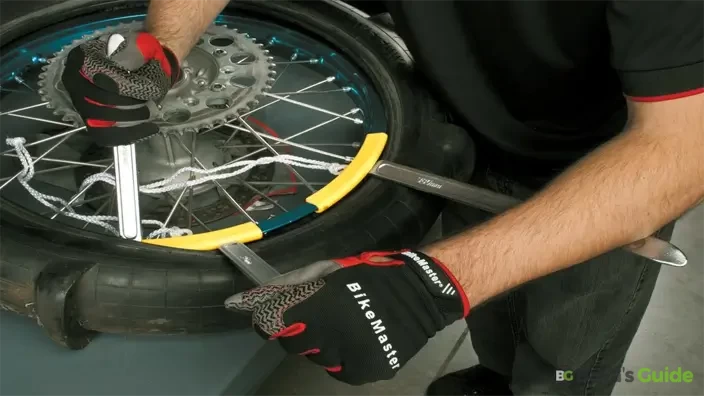
Step 6: Remove The Tire
Once the bead is broken, use a tire iron or pry bar to carefully work your way around the tire, gradually lifting it off the rim. If you have tire spoons or a tire-changing machine, they can make this step easier and reduce the risk of damaging the tire or rim.
Step 7: Secure The Tire's Sides Using Your Feet
The tire may slide down to one side while you are pinning it down, so you need to place it on a featureless facet or any similar item. Face it down pressing from the front side. You may stand on it or kneel by putting all your force on the rubber, it keeps the tire at its point. This way you can also keep the rim free from scratches. If you want to protect the rim from any damage, you should always pry off from the rear side.
Step 8: Lubricate The Bead
If you encounter resistance while removing the tire, apply a generous amount of tire lubricant to the bead. This helps in easing the tire's removal from the rim. For this, you need to pour a huge amount of dish soap that is mixed with a 1 gallon containing 3,800 mL of water. The dishwasher should be foamy enough to cut off grease-resistant items like oil or debris. Pour the soapy liquid all around the edges of the rim. You may opt for a WD-40, tire lube, or cooking oil.
Step 9: Lift The Tire Off The Rim
Always start pressing from one side of your tire on the rubber as it is stuck below the rim. Then, you need to downgrade the pry bar at the bottommost of the rubber. raise the bead upward to the rim. After holding the tire tightly and twisting the screwdriver after fixing it with the pry bar, you need to get the rim up from all sides. The best tools you can use like screwdrivers are wider pry bars and flatter as they lessen the risks of scratching the rim.
Recommended Reading: How To Make Turkish Tea
Step 10: Fully Detach Lug Nuts
With the tire off the ground and the bead broken, go ahead and fully remove the lug nuts. Take the tire off the vehicle and inspect it for any visible damage or wear.
The beneath part of the rim is designed as the bottom half is free rather the top half adheres on the bead at the lower of the tire. Here, you need to lift the rim employing full force. After fixing the pry bar in the rim try hard to pull it up towards you. You must keep pressing from all sides of the tire continuously to get the rim out of it.
Note: It's preferable to apply soapy material to lubricate the rim from all sides in a circular. To Save your time and energy, you can place a wooden mallet on the wheel to flip over the rim.
Method 2
Take a plywood plain piece and print a tire-changing fortification of the machine. Cut the thick wood piece3⁄4 in (1.9 cm) and trace the full wheel changer on it with the help of a pencil. Be careful about the location while you are marking holes and bolts on the plywood.
Besides it, you may purchase the manually manufactured tire changer from the tool market or from online, thankfully. These tools cost you cheaper as compared with making your own.
Material Required For Manual Machine
- ¾-inch thick Flat piece of plywood
- Pencil/pen.
- Screwdriver.
- Pliers
- Pry bar
- A knife
- Metallic rod.
- valve core remover.
- 5-inch nuts/bolts.
- Lubricant.
Step 1: Make A Plywood Machine For Tire Removal
Making a manual wooden device on your own may be challenging but not difficult. Prefabricating the wide range bolts on the plywood where you have traced down the tire changing machine, make holes 13 cm long and 1⁄2 1.3 cm wide with your screwdriver. Then, fix the tire changer over the wooden surface. Place the washer on it to firm the nuts on each marked hole and screw them counterclockwise by hand until they get tight completely.
Over and above, you can fix your machine on a concrete surface. But remember before opting for a concrete device, a masonry drill is required to attach them at their tautest.
Step 2: Loosen The Stem Valve
The next step is to open the stem valve and apply a valveevacuatingtool. Viewing closely, you’ll notice an air valve sticking out at the foremost metallic edge of the rim. Then, turn it to anti clock side counterclockwise to get the rim out of it. Fix another remover that is used for a valve stem into and aside from the existing valve. For popping the stem out, you need to twist the rim continually.
Step 3: Set The Tire On The Wood Base
Start fixing the Foreside of the rim bending towards you and clamp it at the small triangular point beneath the base. Here, with a base nub, you should hook the rim from the lower side. Then, lay down the tire changer that seemed like a bulldozer blade over the rubber stitching on the rim.
Do not ignore fixing the tire to the bottom point too tightly to be plucked off while you are working on it. You can assess its firmness by pushing and pulling repeatedly.
Step 4: Remove Bead With Rod
During discretion, seeing a metal tube that is adhered to the end edge of the rim’s arm, you need to fix the changer rod that seems like a hook into the end of the rim. Furthermore, keep on pressing it slowly but gradually. It will work like striking a wedge pushing down into the rubber, the rim will be exposed to you. If you want to open it further, then apply your force on the wheel by standing or kneeling on it. Repeat this function all around the wheel, the rim will free then.
Step 5: Turn The Tire With The Wedge
Follow the turtle turn, hook the lower edge of the rim, and do your best to push down the wedge contravene to the rubber. During the process of pushing down, you can easily take the wheel bead off the rim. But before it, you should have to loosen the rim from all around it.
Stop overlooking the structure of the rim; it'll be stretched if you have not wrapped it with some kind of required material, such as a rubber mat or the paper that is recommended for this process, while you are turning the rim towards your face.
Step 6: Lock The Changer
Place the wheel on the changer's big Bob in the spoke design in a way that the smaller spoke crosses the nut holes easily. Now take a piece of fabric or stretchable rubber to wrap all around the spoke as it prevents the rim from getting scratched. Then, fix the bracket piece from the existing four spokes over the head of the spoke. Twiddle around to tighten the lock anticlockwise until the tire gets fixed properly in its exact place.
Step 7: Use Dish Soap For Lubrication
After separating, pull the rim a bit so you can settle your body under it easily. Now shower a huge amount of soapy liquid around the lip and area under the rim. The soapy foam makes the rim slippery, so it separates easily.
Besides a regular degreaser detergent, you can also applyWD-40, cooking oil, or special tire lube that is available at some auto parts stores.
Step 8: Shift The Rim Using The Changing Rod.
You need special training and care while pulling back the changing rod as it can damage the tire bead. First, slide the rim slowly around and degrease the rim and all its sides equally.
Step 9: Continue Elevating The Wheel's Lower Section
The rubber you have wrapped around the changer rod, you need to pull it continuously until it raises the tire upon the changer. Similarly, the tire changer is a terrific apprentice to fix the new tire adjacent to it. Then, change the stem valve after leveraging the tire and aerate it fully.
Safety Precautions
Though the installation of the tire is not a hard nut to crack, it is a valuable skill that demands ability, training, and patience. Throughout this protracted process, safety measures cannot be overlooked at all. Below are some of the necessary precautions to follow.
- For lifting the conveyance, it is indispensable to use a hydraulic jack.
- Select a well-ventilated area to perform all the functions, as the dust, soapy odor, or tire fumes affect you severely.
- Before going towards reinstallation, you need to have a prior check to see if any repair is necessitated.
- Make sure that the nuts are tightly and evenly fixed where they are to be passed through.
- Don’t ignore the manufacturer’s instructions throughout the long process.
Frequently Asked Questions
How Long Does It Take To Remove A Tire From A Rim?
Time management varies depending on your ability, potential, and practice but it requires almost 20-30 minutes for the tire replacement process at on average.
What Tools Do I Need To Take A Tire Off A Rim?
To remove a tire from a rim, you'll need the following tools:
- Jack -To lift the vehicle off the ground, providing space to work on the tire.
- Lug Wrench - For loosening and removing the lug nuts that secure the tire to the vehicle.
- Valve Core Tool - To remove the valve core from the tire's valve stem, allowing air to escape.
- Tire Iron OR Pry Bar - For prying the tire off the rim. This tool helps break the bead and lift the tire.
- Bead-Breaking Tool OR Block Of Wood - Used to break the bead, the seal between the tire and the rim.
- Tire Lubricant - Applied to the bead to ease the tire's removal and reduce friction.
- Tire Spoons OR Tire-Changing Machine (optional) - These can make the process easier and reduce the risk of damaging the tire or rim.
Make sure you have these tools on hand and take appropriate safety precautions, such as using jack stands to secure the vehicle.
Can I Reuse The Tire After Taking It Off The Rim?
Yes, surely the old tire can be reused after removing it from the rim but not all the same as it is. It needs a maintenance service providing it a good condition with the guarantee that it has not sustained any scratches during the lengthy process of removing and desecrating its auto parts.
Do I Need A Professional To Remove A Tire From The Rim, Or Can I Do It Myself?
Yes, you can do it on your own without having a professional for removing the tire from the rim. Despite that, you are required knowledge about the complete process and the right tools applied in this procedure from the initial stride to the end. Don’t ignore to implement the safety precautions while going on with it.
Conclusion
Removing a tire from a rim is a task that becomes much simpler with practice. By following these steps and using the right tools, you can confidently tackle this job and save yourself time and money on basic tire maintenance. Always exercise caution and ensure the vehicle is securely supported before starting any tire removal procedure.