In the enchanting world of candles, there's nothing quite as disheartening as discovering the phenomenon of tunneling. As you eagerly light your favorite candle, only to find that the wax seems to retreat, leaving a hollow tunnel in its wake, the magic of a perfectly burning candle is momentarily extinguished. Fear not, for this guide is your beacon in the darkness of candle tunneling, offering insights and solutions to revive the full, radiant glow of your cherished candles.
So, whether you're a candle connoisseur seeking to rescue a beloved artisanal creation or someone who simply wants to maximize the life and luminosity of every candle, join us on this illuminating journey. Together, we'll discover the secrets to banishing tunneling and rekindling the enchantment of a perfectly burning candle.
Table of Contents
- What Is Candle Tunneling?
- Understanding Candle Tunneling: Causes & Solutions
- Solution 1: Hair Dryer Method
- 1- Gather Your Supplies
- 2- Prepare The Area
- 3- Examine The Tunneling
- 4- Adjust The Hair Dryer
- 5- Hold The Hair Dryer Above The Tunnel
- 6- Rotate & Monitor The Candle
- 7- Use A Heat-Resistant Tool
- 8- Persist Until The Surface Is Uniform
- 9- Allow The Candle To Cool
- 10- Trim The Wick
- 11- Monitor Future Burns
- Solution 2: Aluminium Foil Method
- Solution 3: Hot Spoon Method
- Candle Burning Techniques For Avoiding Tunneling
- Frequently Asked Questions
- Conclusion
What Is Candle Tunneling?
Candle tunneling refers to a situation where a candle burns down the center, leaving an unburned outer wax shell. This can happen when a candle is not burned long enough during each use. The outer wax remains, creating a tunnel-like structure, and the candle may eventually become difficult to light or burn unevenly.
To prevent tunneling, it's recommended to allow the candle to burn long enough during each use to melt the entire surface, ensuring an even pool of wax. This promotes an even burn and maximizes the candle's lifespan. Additionally, trimming the wick before each use can help control the size of the flame and reduce the likelihood of tunneling.
Understanding Candle Tunneling: Causes & Solutions
Tunneling occurs when a candle burns down the center, leaving untouched wax along the sides. This not only diminishes the visual appeal of your candle but also shortens its overall lifespan. In this exploration, we will delve into the causes of tunneling, unravel the science behind it, and most importantly, unveil a repertoire of strategies to fix and prevent this common candle woe.
Some people are of the view that tunneling occurs only when your candle is of low quality. Beyond a doubt, it’s a fact that tunneling is likely to happen when you have purchased low-quality candles. The causes can be drawn in two forms.
1- Faulty Candle Burning
Tunneling in candles is a common issue caused by improper burning habits, and it can affect both store-bought and homemade candles. Understanding how tunneling occurs is essential for preventing and fixing this problem.
Understanding these factors empowers candle enthusiasts to adopt practices that promote even burning, discourage tunneling, and enhance the overall candle-burning experience. By addressing these aspects, one can ensure that each candle illuminates its surroundings with a warm, radiant glow, free from the confining shadows of tunneling.
2- Poorly Sized Wicks
Poorly sized wicks are a significant contributor to tunneling in candles. The size of the wick plays a crucial role in how efficiently a candle burns and the distribution of heat across the wax. By understanding the crucial role of wick size and taking proactive measures to ensure an appropriately sized wick, candle enthusiasts can mitigate tunneling issues and enjoy a more even and efficient burn. It's an essential step in the art and science of candle making, ensuring that each candle illuminates its surroundings with a consistent, radiant glow.

Solution 1: Hair Dryer Method
The first important thing you can use as an external heat source such as a heat gun or a hair dryer that helps you melt the wax sticking around the sides and edges of the container. If you are doing this activity for the first time, you should not ignore the container and old clothes that might not get affected if wax sticks on them. Remember, never look over to lay a piece of paper under the candle to keep the table or floor safe from melted wax.
Hark back to your mind, never switch on your hair dryer on the candle rather switch it on and hold it a bit away at an appropriate distance from the candle where your candle could not be blown off.
Fixing candle tunneling with a hair dryer is a creative solution that involves gently melting and reshaping the wax to create an even surface. Here are step-by-step instructions to address tunneling using a hair dryer:
1- Gather Your Supplies
Ensure you have a hair dryer with adjustable heat settings and a safe space to perform the process.
2- Prepare The Area
Choose a stable, flat surface to work on. Lay down a protective covering, such as a towel or newspaper, to catch any melted wax.
3- Examine The Tunneling
Identify the extent of the tunneling in your candle. Note the depth and width of the tunnel.
4- Adjust The Hair Dryer
Set the hair dryer to a low or medium heat setting. High heat may cause the wax to become too hot, leading to other issues.
5- Hold The Hair Dryer Above The Tunnel
Hold the hair dryer several inches above the candle's surface, directing the airflow into the tunnel. Maintain a safe distance to avoid overheating.
6- Rotate & Monitor The Candle
Gently rotate the candle to ensure even heating. This helps distribute the melted wax and reshape the tunnel. Keep a close eye on the candle as you use the hair dryer. Stop periodically to check the progress and prevent overheating.
7- Use A Heat-Resistant Tool
If necessary, use a heat-resistant tool, such as a butter knife, to spread and shape the softened wax. Be cautious not to damage the wick or the candle's structure.
8- Persist Until The Surface Is Uniform
Continue the process until the wax around the tunnel has melted and leveled, creating a more even surface.
9- Allow The Candle To Cool
Once you're satisfied with the reshaping, allow the candle to cool and solidify before relighting.
10- Trim The Wick
After the candle has cooled, trim the wick to the recommended length for subsequent burns.
11- Monitor Future Burns
Pay attention to the candle's burning characteristics in subsequent uses. Ensure you follow proper burning practices to prevent tunneling from reoccurring.
Using a hair dryer to fix tunneling is a hands-on approach that requires patience and careful monitoring. While it may not restore the candle to its original state, it can help salvage the burning experience and maximize the remaining wax. Always prioritize safety during the process, and remember that prevention, such as proper initial burning practices, is key to avoiding tunneling in the first place.
Find More: How To Propagate Orchids
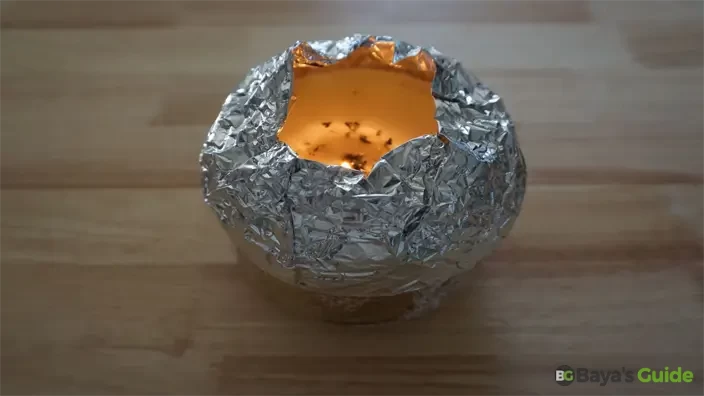
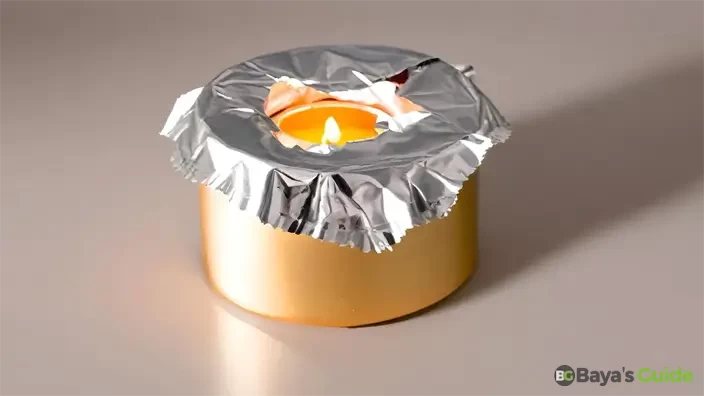
Solution 2: Aluminium Foil Method
The second important method to tunnel the candle is with the use of aluminum foil by covering the candle’s heat or flame so that the wax will directly go over the top layer after melting. Same as the first method, you must take precautionary protective wearing before dealing with the hot wax. Also, be careful of holding the candle container as it gets very hot.
Tunneling wax with aluminum foil creates a channel for melted wax to flow through. To do this, you can shape the foil into a tunnel-like structure, place it on a surface, and pour melted wax through it. The foil helps direct the wax, creating a tunnel effect. Ensure the foil is sturdy enough to hold its shape and that you're cautious with hot wax to prevent burns or accidents. Certainly! Here's a step-by-step method for tunneling a candle with aluminum foil:
1- Cut Aluminum Foil
Cut a piece of aluminum foil long enough to wrap around the candle with some extra for creating the tunnel.
2- Shape The Foil
Roll the foil into a cylindrical shape, leaving one end open to act as the tunnel. Ensure it's wide enough for the melted wax to flow through.
3- Wrap Around Candle
Wrap the aluminum foil around the candle, ensuring a snug fit. The tunnel end should be above the candle's top.
4- Secure In Place
If needed, use additional foil or tape to secure the wrapped foil in place, preventing any leaks.
5- Melt The Candle
Light the candle and allow it to burn until a pool of melted wax forms at the top.
6- Channeling The Wax
The melted wax should flow through the tunnel created by the foil. Adjust the foil if necessary to control the wax flow.
7- Observe The Wax
Observe the tunneling effect as the wax travels down the foil, creating unique patterns.
8- Caution
Be cautious with hot wax. Avoid touching the foil or candle during the process to prevent burns.
9- Extinguish Candle
Once you've achieved the desired tunneling effect or if the candle burns down to a safe point, extinguish the flame.
Note: Remember to prioritize safety during this process, and never leave a burning candle unattended.
Solution 3: Hot Spoon Method
The third way to set your candle tunneling is with a spoon that could be as per the height at least the middle of the candle. Be sure before enlightening a candle as it is longer enough to the container’s brim. Later, you can dispose of the spoon and clean it with a paper towel- wax can clog the flow of wax any further.
Tunneling a candle with wax using a spoon involves creating a channel for melted wax to flow through. Here's a simple step-by-step method:
1- Light The Candle
Light the candle and let it burn until a pool of melted wax forms at the top.
2- Create A Channel
Hold the spoon over the flame for a few seconds to heat it. Then, use the heated spoon to carve a channel into the soft, melted wax on the candle's surface. Move the spoon to create a tunnel-like structure.
3- Adjust As Needed
Continue melting the wax with the spoon and adjusting the channel's shape to achieve the desired tunneling effect.
4- Observe The Melted Wax
Observe the wax flowing through the tunnel created by the spoon, forming unique patterns.
5- Caution
Be cautious with the hot spoon and melted wax to avoid burns. Hold the spoon by the handle to prevent direct contact with the heated part.
6- Extinguish Candle
Once you've achieved the desired tunneling effect or if the candle burns down to a safe point, extinguish the flame.
This method allows for more direct control over the tunneling process using a simple kitchen tool. Ensure safety precautions and never leave a burning candle unattended.
Candle Burning Techniques For Avoiding Tunneling
Certainly! Here are five tips to help your candles burn correctly and avoid tunneling:
- Allow the candle to burn long enough during the first use to create a full melt pool that extends to the edges. This sets the "memory" of the candle, preventing future tunneling.
- Burn the candle for a sufficient amount of time, ensuring it stays lit long enough to melt the entire surface on subsequent uses. This prevents the formation of a tunnel and promotes an even burn.
- Trim the candle wick to about 1/4 inch before each use. This helps control the size of the flame, preventing excessive heat and uneven burning, which can contribute to tunneling.
- Place candles away from drafts, as they can cause uneven burning. A steady flame helps maintain an even melt pool, reducing the likelihood of tunneling.
- Consider using accessories like candle toppers or lanterns to protect the flame from drafts and promote even burning. These accessories can help maintain an optimal burning environment.
By following these tips, you can enhance the performance of your candles, ensuring a more even burn and minimizing the risk of tunneling.
Frequently Asked Questions
Do Candle Warmers Fix Tunneling?
Candle warmers are specifically designed electric devices to liquefy candle wax without putting it to flame. These devices provideuniform heat from all candle's sides evenly so that the wax fluxes and flows down to the bottom. It is a fact this strategy doesn’t help tunneling prevent rather it maximizes the candle’s burning time.
Can You Microwave A Candle To Fix Tunneling?
Though it is not out of the question, you can microwave your candle to fix its tunneling. For that, you need to set your microwave at 80 - 175 Fahrenheit only for two minutes. Your candle will turn into liquid and flow smoothly.
Note: Say no to your microwave for tunneling your candles in to avoid some damage.
How Can I Fix Candle Tunneling?
To fix tunneling, burn the candle long enough during each use to create a full melt pool that extends to the edges. This ensures an even burn and prevents future tunneling.
Can I Fix A Tunneling Candle In One Use?
It might take more than one use to fix tunneling. Initially, burn the candle for an extended period to melt the entire surface, and continue this practice for subsequent uses.
Why Does Tunneling Happen In Candles?
Tunneling occurs when a candle is not burned long enough during each use. This leads to the wax melting only down the center, leaving an unburned outer shell.
How Long Should I Burn A Candle To Avoid Tunneling?
Allow the candle to burn until a full melt pool forms across the entire surface. This may take a couple of hours, depending on the size of the candle.
Can Tunneling Be Prevented Altogether?
While complete prevention may be challenging, following proper burning practices, such as an extended first burn and regular wick trimming, can significantly reduce the likelihood of tunneling in candles.
Conclusion
Fixing candle tunneling involves a combination of preventive measures and corrective actions. To address tunneling. Allow the candle to burn long enough during the first use to create a full melt pool that extends to the edges. This establishes a proper "memory" for the candle. Burn the candle for an extended period during each use to ensure the entire surface melts, preventing the formation of a tunnel.
In cases of existing tunneling, corrective measures include using a heated spoon or aluminum foil to create channels, redistributing the wax, and encouraging an even burn. By incorporating these practices, you can enhance the performance of your candles, minimize tunneling, and enjoy a more even and prolonged burn.